Today we will create a Cool inspired poster using Photoshop CS2 or later version and we will put all the shortcuts we use between ( ) that will help you to be faster.

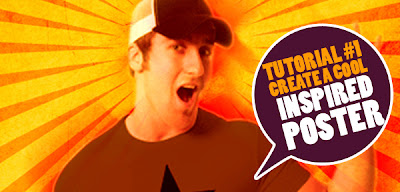
What we will get
Step 1:
Create a new file (ctrl+n) with this parameters.

Step 2:
Fill the background layer by orange color #ff9a02 by hitting ( alt+back space ).

Step 3:
Open a High Res paper Textures you can get it free from here
Free high res grungy paper textures
Step 4:
Drag the paper textures to your file and use free transform (ctrl+t) to adjust the dimension holding (shift+alt) to keep the proportion of it.

Step 5:
then change the Blending mode to Hard light and set opacity to 50%

Step 6:
Draw rectangle using rectangle tool (u) fill with color dark red #b51217 .

Step 7:
Select pen tool (p) and add two anchors to the shape then select path selection tool (A) and move the new anchors to get shape like this.

Step 8:
Use free transform (ctrl+t) then hit warp mode and chose Arc and adjust the bend to 20, add layer style Drop shadow and Inner glow.


Step 9:
open the pic you chose for your Design maybe you can use your own picture but now we will use picture i found it through google cool revolution man get rid of the background and drag it to your file adjust the size using free transform (ctrl+t).

Step 10:
We will adjust the pic to be suitable to our design
select Image>adjustments>Photo filter , Chose worming filter (85) and set the density to 100%.

Step 11:
Duplicate picture layer (ctrl+j) and put it under the original one then go to filter>Blur>motion blur, make the angle 45 degree and the distance 500px then change the layer blending mode to color burn you can repeat this step several times with changing motion blur angle for mine i make it twice 45 degree, -45 degree.

Step 12:
low the opacity of the original layer we can say to 80%.
step 13:
We will add a professional touch to our design
select custom shape tool (u) select shape then press the small arrow up right and select all then select the shape you want and draw it over your poster with black color #0000 and then change the blending mode to overlay and opacity to 70%.


Step 14:
We will add some text to our design write whatever you want and use warp text arc bend it +20 then add layer style stroke maybe, add another text as you like.


step 15:
We will finish our design by correct the poster by brightness/contrast and set contrast to +25.


And here we go.
I hope it was easy to follow thanks.

No comments:
Post a Comment